
Setup Your Feedaura Project

Follow these simple steps to integrate Feedaura into your web application and start collecting valuable user feedback.

1. Create Your Account & Project

Visit Feedaura and create your account.
Once logged in on Feedaura Dashboard, click on the “Create Project” button and provide your project details.
After creating a project, click the “Manage Project” button from the dashboard to copy your unique project secret key.

2. Integrate with Your Framework

Choose your framework below and follow the integration steps:
  • Next.js
  • React
  • HTML
  • Vue
  • Angular
Step 1: Create TypeScript Definitions (TypeScript only)Create a global.d.ts file in your project root:
// global.d.ts
interface FeedbackConfig {
  projectSecret: string;
  position?: "bottom-right" | "bottom-left" | "top-right" | "top-left";
  primaryColor?: string;
  secondaryColor?: string;
  textColor?: string;
  backgroundColor?: string;
  theme?: "light" | "dark";
  buttonText?: string;
  buttonIcon?: "feedaura" | string;
  iconColor?: string;
  buttonSize?: "small" | "medium" | "large";
  buttonRadius?: string;
  widgetStyle?: "floating" | "inline";
  zIndex?: number;
  autoCloseAfterSubmit?: boolean;
  animated?: boolean;
  productName?: string;
  placeholder?: string;
  submitText?: string;
  headerText?: string;
  questionText?: string;
  feedbackLabelText?: string;
  themeColor?: string; // Legacy support
}

declare global {
  interface Window {
    FeedbackWidget?: (config: FeedbackConfig) => void;
  }
}

export {};
Step 2: Create a FeedauraWidget componentCreate a client component that loads the Feedaura CDN script:
// components/feedaura-widget.tsx
'use client'

import Script from 'next/script'
import React from 'react'

const FeedauraWidget = () => {
  return (
    <Script
      strategy='lazyOnload'
      type='module'
      onLoad={() => {
        window.FeedbackWidget?.({
          projectSecret: process.env.NEXT_PUBLIC_FEEDAURA_PROJECT_SECRET!,
          position: "bottom-right",
          primaryColor: "#fb2c36",
          theme: "light",
          questionText: "What was your experience while using our product?",
          feedbackLabelText: "Write your feedback",
          autoCloseAfterSubmit: true,
        })
      }}
      src="https://cdn.jsdelivr.net/npm/@feedaura/feedback-widget/dist/feedback-widget.min.js"
    />
  )
}

export default FeedauraWidget
Step 3: Add the widget to your layoutImport and add the FeedauraWidget component to your root layout:
// app/layout.tsx
import FeedauraWidget from '@/components/feedaura-widget'

export default function RootLayout({
  children,
}: {
  children: React.ReactNode
}) {
  return (
    <html lang="en">
      <body>
        {children}
        <FeedauraWidget />
      </body>
    </html>
  )
}
Step 4: Set up Environment Variables
# .env.local
NEXT_PUBLIC_FEEDAURA_PROJECT_SECRET=your_project_secret_here
The widget component uses Next.js Script component for optimal loading. The lazyOnload strategy ensures the feedback widget loads after the page is interactive.

Configuration Options

Customize your feedback widget with these configuration options:
PropertyTypeDefaultDescription
projectSecretstringRequiredYour unique project secret from Feedaura dashboard
positionstring"bottom-right"Widget position: "bottom-right", "bottom-left", "top-right", "top-left"
primaryColorstring"#fb2c36"Primary theme color for the widget
secondaryColorstring"#fb2c36"Secondary color for accents
textColorstring"#333333"Text color for the widget
backgroundColorstring"#FFFFFF"Background color of the widget
themestring"light"Theme mode: "light" or "dark"
buttonTextstring""Custom text for the feedback button
buttonIconstring"feedaura"Icon to display on the button
iconColorstring"#FFFFFF"Color of the button icon
buttonSizestring"medium"Button size: "small", "medium", or "large"
buttonRadiusstring"50%"Border radius of the button
widgetStylestring"floating"Widget style: "floating" or "inline"
zIndexnumber9999Z-index of the widget
autoCloseAfterSubmitbooleantrueAutomatically close widget after submission
animatedbooleantrueEnable animations
productNamestring"product"Name of your product
placeholderstring"Please write here"Placeholder text for feedback input
submitTextstring"Submit"Text for submit button
headerTextstring"Give us your feedback"Header text of the widget
questionTextstring"What was your experience while using our product?"Question text for users
feedbackLabelTextstring"Write your feedback"Label for feedback textarea

Example with Custom Configuration

window.FeedbackWidget({
  projectSecret: 'your_project_secret_here',
  position: 'bottom-left',
  primaryColor: '#0F8CFF',
  secondaryColor: '#0066CC',
  theme: 'dark',
  buttonSize: 'large',
  headerText: 'We value your opinion!',
  questionText: 'How was your experience?',
  submitText: 'Send Feedback',
  autoCloseAfterSubmit: true,
  animated: true,
});

Verify Your Installation
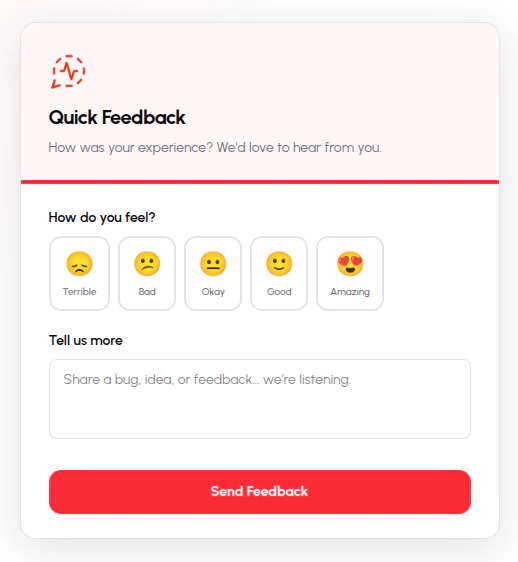
After deploying your application with Feedaura integrated:
  1. Visit your deployed site
  2. Check that the feedback button appears in the specified position
  3. Click the button to open the feedback form
  4. Submit a test feedback message
  5. Log in to your Feedaura Dashboard to confirm your feedback was received
  6. Explore the AI analysis of your test feedback
Feedaura Widget Preview

Troubleshooting

  • Verify that your project secret is correct
  • Check that the script is loading properly (check Network tab in DevTools)
  • Ensure the script is placed before the closing </body> tag or loaded after DOM is ready
  • Check browser console for any errors
  • Verify that window.FeedbackWidget is defined after script loads
  • Verify your internet connection
  • Check that your project is active in the Feedaura dashboard
  • Ensure your project secret is correctly associated with your project
  • Check the Network tab for failed API requests
  • If the widget appears behind other elements, adjust the zIndex property
  • For theme issues, try explicitly setting theme="light" or theme="dark"
  • If colors don’t match your brand, use the primaryColor and secondaryColor props
  • Check if any global CSS is overriding widget styles
  • Make sure global.d.ts or typings.d.ts is in your project root or src directory
  • Verify that TypeScript is recognizing the type definitions
  • Restart your TypeScript server/IDE after adding type definitions

Next Steps

I